apex-documentation
Creating experiment files
An APEX 4 experiment file is an XML file. Like any XML file, it contains a root
element (<apex/>), which contains various main elements. The general structure
of an APEX 4 experiment file could be as follows:
    <?xml version='1.0' encoding='UTF-8'?>
    <apex>
        <procedure xsi:type="apex:adaptiveProcedure">
            <parameters> ... </parameters>
            <trials> ... </trials>
        </procedure>

        <screens> ... </screens>
        <datablocks> ... </datablocks>
        <devices> ... </devices>
        <stimuli> ... </stimuli>
    </apex>
The main elements are listed in the next section. Subsequently, each main element is discussed briefly.
Main APEX elements
Here we describe the main elements of the experiment, and the order in which they should occur. Some of them are compulsory, some are optional, and some contain child elements (see basic concepts XML). Only the first child element is given. A complete listing of all the elements is given in the schema documentation.
-
Procedure see Procedures
-
Corrector see Procedures
-
Screen see Screen
-
Datablocks see Datablocks
-
Devices see Devices
-
Filters optional see Filters
-
Stimuli see Stimuli
-
Connections optional see Connections
-
Randomgenerators optional used to set parameters to random values, for example useful to implement level roving. An example of level roving is given in Roving
-
Calibration optional see Calibration
-
Results optional see Results and Using XSLT transforms
-
Interactive optional see Interactive
-
General optional see General
In the next paragraphs these elements will be described in more detail and their main child elements will be given.
Declaration of Main element
To associate an experiment file with the correct name space and schema, the following attributes are necessary:
    <apex:apex xmlns:xsi="http://www.w3.org/2001/XMLSchema-instance"
        xmlns:apex="http://med.kuleuven.be/exporl/apex/3.0.2/experiment">
    ...
    </apex:apex>
For more information on name spaces and schema declarations, we refer to the XML specifications. For APEX 4 it is sufficient to copy the text above. Note that the namespace contains a version number, in the example 3.0.2. When APEX opens an experiment file with a lower schema version number than its own version number, it will attempt to upgrade the experiment file to the new version. Any warnings or errors in the conversion process will be shown in the message window. Alternatively, you can manually upgrade the experiment file, by changing the version number, and fixing the validation errors that OxygenXML may show. Alternatively, you can use the apexupgrader tool in the APEX 4 binaries folder. Drag your experiment file on top of the apexupgrader tool to start the conversation. Your upgraded file will have an ’.upgraded’ appended to the original file name.
Although the abovementioned attributes are sufficient, one modification
can be useful. If you use an XML editor with schema support (to allow
autocompletion and showing documentation from the schema), it needs to
know where the APEX 4 schema(experiment.xsd) is located. This can be indicated by adding an
absolute or relative path to the apex schema to the attribute. If for
example APEX 4 is installed in the default location (C:/Program Files/apex4),
the result would be as
follows:
    <apex:apex xmlns:xsi="http://www.w3.org/2001/XMLSchema-instance"
     xmlns:apex="http://med.kuleuven.be/exporl/apex/4.0.0/experiment"
     xsi:schemaLocation="http://med.kuleuven.be/exporl/apex/4.0.0/experiment
     file:C:/Program\%20Files/apex4/schemas/experiment.xsd>"
    ...
    </apex:apex>
Or you could refer to the schema that we provide on our web server. This has the advantage that you don’t have to refer to the absolute path on a particular computer, but has the downside that it requires an internet connection:
    <apex:apex xmlns:xsi="http://www.w3.org/2001/XMLSchema-instance"
     xmlns:apex="http://med.kuleuven.be/exporl/apex/4.0.0/experiment"
     xsi:schemaLocation="http://med.kuleuven.be/exporl/apex/4.0.0/experiment
     https://exporl.med.kuleuven.be/apex/schemas/4.0.0/experiment.xsd">
    ...
    </apex:apex>
Procedures
The Procedure controls the flow of an experiment. It decides on the next screen to be shown and the next stimulus to be presented. Generally a procedure will make use of a list of predefined trials.
e.g.
    <procedure xsi:type="apex:constantProcedure">
        <parameters>
            ...
        </parameters>

        <trials>
            <trial id="trial1" >
                ...
            </trial>
            <trial id="trial2" >
                ...
            </trial>
        </trials>
    </procedure>
The attribute determines the type of procedure that will be used. There are 5 procedure types implemented:
- constantProcedure:
-
each trial is presented a specified number of times
- adaptiveProcedure:
-
the dependent parameter? (e.g.: level) of the stimulus depends on the response of the subject
- trainingProcedure:
-
a stimulus is presented AFTER the user has selected the trial by pressing a button on the screen. If no corresponding trial is found, an error message is shown. This procedure is designed to be used as a replacement for the constant procedure to allow subjects to perform training before starting the actual experiment
- pluginProcedure:
-
allows the user to implement a custom procedure using ECMAScript, see section [sec:plugins].
- multiProcedure:
-
contains several child procedures of any of the other 4 types and selects between them. This procedure ends when all child procedures have ended
Every contains the following elements:
-
specifies the workings of a procedure, e.g., specifies the number of presentations per trial. To know which parameters can be set for a certain procedure, it is easiest to consult the schema documentation or an example experiment file. Please also read section [sec:Parameters].
-
specifies each trial that can be presented. A trial consists of a screen to be shown, a stimulus to be presented and the correct response. Each of these can be defined here.
The procedure determines whether the experiment is completed.
One particular parameter for the procedure is the corrector. The corrector compares the user’s response to the correct response and can be used by the procedure to determine the next trial. The type of corrector to be used is defined using the attribute. E.g.:
    <procedure xsi:type="apex:constantProcedure">
      <parameters>
       <presentations>2</presentations>
       <order>sequential</order>
       <corrector xsi:type="apex:isequal"/>
      </parameters>
      ...
    </procedure>
Two main Correctors exist:
-
compares whether the text defined in the element in and the result from the screen (the subject’s response) are exactly the same
-
this corrector is used together with in.
Screen
A screen is a GUI (Graphical User Interface) that is to be used by the subject to respond to the stimulus that was presented. The layout of the screen can be changed in different ways and a variety of elements can be added to the screen, such as buttons, labels, pictures and movies (take a look in the APEX reference manual for an exhaustive list of all elements that can be added or changed). A brief overview of the possible elements is given below.
<screens>
    <general>
    ...
    </general>
    <reinforcement>
    ...
    </reinforcement>
    <style_apex> ... </style_apex>
    <style> ... </style>
    <childmode>  ... </childmode>
    <defaultFont> ... </defaultFont>
    <defaultFontsize> ... </defaultFontsize>
    <screen id="screen1">
    ...
    </screen>
</screens>
-
Some general properties of the entire APEX window are set in this section, such as removing the panel on the right hand of the screen or adding a repeat button. The properties are applied for each particular screen defined below.
-
indicates whether a progress bar is shown and whether feedback is given, and defines what kind of feedback about the procedure and correctness of answers is shown to the user. This is valid for the whole experiment. includes:
-
if the value is a progress bar will be displayed in the right hand bottom corner of the screen. The bar indicates how many trials have been completed and how many remain. When conducting an experiment in an adaptive way, it shows when a reversal occurs. The progress bar will increase at every reversal while the number of trials varies. The progress bar is not functional for multiprocedure or trainingprocedure.
-
shows visual feedback according to the correctness of the last answer. Feedback is shown using an upward or downward pointing thumb in the right hand panel if the value is set to . No feedback is given if the value is .
Other elements can be added to but are optional:
-
duration of time after response (in msec) that APEX 4 waits before presenting the next trial. During this interval feedback can be displayed. If feedback is false, but a length is present, the specified time will be the time between two trials.
-
When set to , the clicked screenelement is highlighted (i.e. the subject’s answer). The correct screenelement is highlighted (irrespective of the answer of the subject) if the value is set to . No highlighting occurs if the value is .
-
and can be used to set a feedback picture different from the standard thumb up/down. A prefix for the filename has to be specified.
-
When set to , the element corresponding to the currently playing stimulus is highlighted.
-
-
Style that has to be applied to the whole of Apex.
-
Style that has to be applied to all screens.
-
Defines the elements used in child mode. In , the experiments are adapted to the interest of children. It mainly involves a different screen panel and enables intro/outro movies.
-
and Name and size of the default font to be used for all elements of every screen.
-
a screen is defined for each stimulus. Each screen has an ID by which it can be referred to elsewhere in the experiment file (cf in procedure/trial to associate it with a stimulus).
Datablocks
A datablock is an abstraction of a basic block of data that can be processed by APEX 4 and can be sent to a matching device. In the case of a sound card, the datablock would be an audio signal in the form of a series of samples that is commonly stored on disk as a so-called wave file.
    <datablocks>
        <uri_prefix>...</uri_prefix>
        <datablock id="datablock_star">
            <device>soundcard</device>
            <uri>star.wav</uri>
        </datablock>
    </datablocks>
Basically, in element , a wave file on disk is assigned an ID, such that it can be referred to elsewhere in the experiment file.
-
indicates the path where APEX will look for the file, relative to the path where the experiment file is stored. See Prefixes
-
for each wave file a datablock is defined, with an ID.
Devices
A device is a system connected to the computer that can be controlled by APEX 4 . Devices can send signals to a transducer. Examples are sound cards and interfaces to . Device(s) can have parameters that can be controlled by APEX 4 .
    <devices>
        <device id="soundcard" xsi:type="apex:wavDeviceType">
            <channels>2</channels>
            <gain>0</gain>
            <samplerate>44100</samplerate>
        </device>
    </devices>
The following device types are currently supported:
- wavDeviceType
-
for sound cards
- L34Type
-
for an interface to cochlear implants
Filters
Filters are used to process data before sending it to a device. For
example, if you want to change the level of your signal, you can use an
amplifier, which is a specific kind of filter.
However, not every experiment needs filters. If the signals are routed
directly to the output device without any processing, the section <filters/> can
be dropped.
Currently implemented filters are:
- amplifier
-
a type of filter which allows to amplify or attenuate sound data
<filter xsi:type="apex:amplifier" id="ampli">
- generator
-
a special type of filter which generates a defined stimulus, such as a sine (SineGenerator) or white noise
        <filter xsi:type="apex:generator" id="SineGenerator">
          <type>sinus</type>
        </filter>
- dataloop
-
: a type of filter which can loop a given datablock infinitely (continuous = ), and can jump randomly (randomjump = )
        <filter xsi:type="apex:dataloop" id="noisegen">
          <continuous>true</continuous}
          <datablock>noisedata</datablock}
          <randomjump>true</randomjump}
        </filter>
- PluginFilter
-
a type of filter which is an interface for implementing custom filters (see Examples).
contains those elements which specify a filter or a generator
    <filter id="noisegen" xsi:type="apex:dataloop">
       <device>soundcard</device>
       <channels>1</channels>
       <continuous>false</continuous>
       <datablock>noisedata</datablock>
       <basegain>0</basegain>
       <gain>0</gain>
    </filter>
Stimuli
Stimuli are the auditory events presented to the subject. They can consist of one or more datablocks that are routed to any number of devices, simultaneously or sequentially.
    <stimuli>
      <fixed_parameters>
      ...
      </fixed_parameters>

      <stimulus id="stimulus_sentence1">
      ...
      </stimulus>
    </stimuli>
See Parameters for a description of the element .
Connections
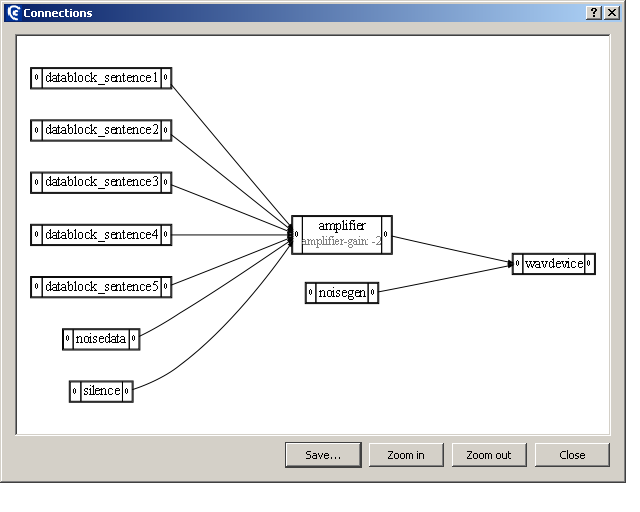
Connections are defined to connect Datablocks, Filters and Devices. Any Datablock can be connected to any Filter or Device and any Filter can be connected to any other Filter or Device.
      <connections>
        <connection>
         ...
        </connection>
      </connections>
defines how the different filters are routed to the output device(s)
APEX can visualise the connections by clicking on the “show stimulus connections” item in the menu.
An example connection diagram
Calibration
In order to present any given stimulus at a known sound pressure level, a calibration gain is applied before the stimulus is played. Calibration is the process of measuring which calibration gain is necessary for a given stimulus to achieve a certain sound pressure level. Calibration parameters are set in the element of the apx file. Here a ID and parameters to be calibrated are defined. Since the stimuli used in most experiments are short, it is often helpful to make a longer version of the stimulus for use during calibration. This stimulus must have it’s own and element definitions. e.g:
    <datablock id="datablock_tone">
        <device>wavdevice</device>
        <uri>tone.wav</uri>
    </datablock>

    <datablock id="datablock_tone_long_calibration">
                <device>wavdevice</device>
                <uri>tone_long_calibration.wav</uri>
    </datablock>

    <stimulus id="stimulus_tone">
        <datablocks>
        <sequential>
            <datablock id="datablock_tone"/>
        </sequential>
        </datablocks>
        <variableParameters></variableParameters>
        <fixedParameters></fixedParameters>
    </stimulus>

    <stimulus id="stimulus_tone_long_calibration">
                <datablocks>
                    <sequential>
                        <datablock id="datablock_tone_long_calibration "/>
                    </sequential>
                </datablocks>
                <variableParameters></variableParameters>
                <fixedParameters></fixedParameters>
            </stimulus>

    <calibration profile="Calibprofile_HIB">
            <stimuli>
                <stimulus id="stimulus_calibration_tone"/>
    <stimulus id="stimulus_calibration_noise"/>
            </stimuli>
            <parameters>
                <parameter id="gainid_amp_tone">
                    <targetamplitude>30</targetamplitude>
                    <calibrationamplitude>80</calibrationamplitude>
                    <mute>-150</mute>
                    <min>-100</min>
                    <max>100</max>
                </parameter>
                <parameter id="gainid_amp_noise">
                    <targetamplitude>15</targetamplitude>
                    <calibrationamplitude>80</calibrationamplitude>
                    <mute>-150</mute>
                    <min>-100</min>
                    <max>100</max>
                </parameter>
            </parameters>
        </calibration>
The parameter to be calibrated is usually a gain parameter for an amplifier element. In the example there are two stimuli that need to be calibrated. The stimuli have datablock ID’s and . Since the stimuli are derived from different datablocks and different WAV files, they must be calibrated separately. For this reason, the datablocks are connected to separate amplifier elements with IDs and . In this example, these two amplifier gain parameters are calibrated.
Calibration consists of a GUI for calibrating parameters and saving and applying calibration results. Any stimulus defined in the experiment files can be used as a calibration stimulus.
Typically, calibration is the process of measuring which value of a digital parameter corresponds to a certain physical magnitude , e.g., determining which internal amplification is necessary for a given wave file to achieve a certain sound pressure level.
APEX 4 provides a GUI to ease calibration. APEX 4 can only calibrate parameters, i.e., it can set a parameter to a certain value such that the resulting physical magnitude is the one defined in the experiment file in the element.
Because often the same calibration is useful for a set of experiment files, calibrations are stored under so-called calibration profiles. The calibration profile to be used must be specified in the element. For example if multiple experiment files are used for speech in noise tests, the calibration profile could be SpeechInNoise.
As it is possible to use APEX 4 on the same computer with the same experiment files and calibration profile in different contexts (e.g., different types of headphones, which have different calibration settings), makes use of the concept hardware setup. A hardware setup associates a label to a certain set of hardware devices. The current hardware setup can be selected at runtime, i.e., cannot be specified in the experiment file.
If is defined in the experiment file and the calibration profile has not been calibrated before for the current hardware setup, the calibration window will be shown at the start of the experiment.
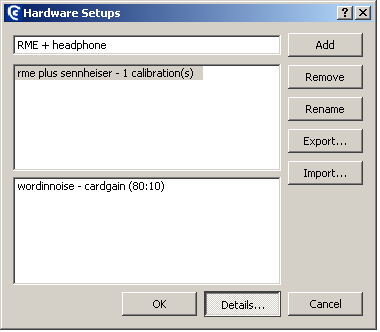
If the calibration profile was calibrated before, but you wish to
recalibrate or change the current hardware setup, select Recalibrate
from the menu, select Manage profiles and add the desired label for
the current hardware configuration, eg. “RME + headphones”, and click
Add and OK. This configuration will also appear in the APEX 4 window in
the lower right hand corner. Under Details... the different
calibration profiles that have been calibrated before will be shown.
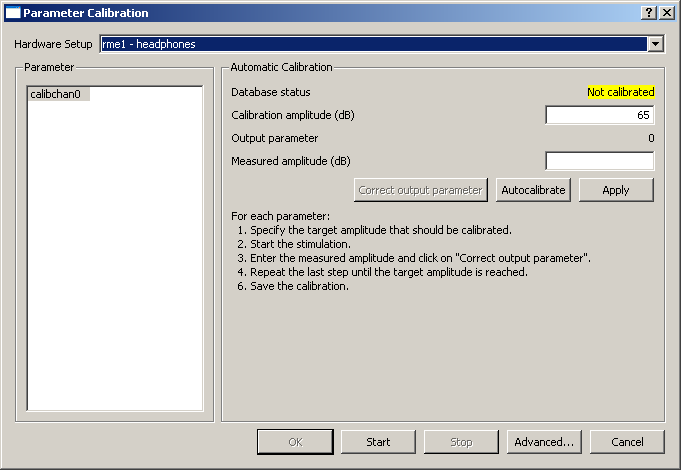
On the left hand side of the main calibration window the parameters to
be calibrated are shown (as specified in the element in the experiment
file). In this example the parameter is calibrated, i.e. the gain of the
sound card. First allow the calibration stimulus ample time to be able
to measure an accurate value with a measuring device or use the
averaging function of the device. Enter the measured amplitude (in
Measured amplitude) and click on ’Correct output parameter’.
Repeat until the intended and measured values are the same. To save the
result, click apply, and click on the OK button. APEX 4 will store this
profile and retrieve it each time it is used.
Important
-
Remember to check whether the correct Hardware setup is selected when starting an experiment. APEX 4 will always use the hardware setup used in the previous experiment unless otherwise specified.
-
ApplyandOK. Each calibrated parameter needs to be saved by clicking on Apply and after all parameters are calibrated clicking on OK at the bottom of the dialog.
It can be of interest to calibrate at a higher level than the desired stimulation level, to avoid interference of background noise. If a yellow message appears, the signal has clipped.
Important: Calibration values are stored as a value of a parameter
for a combination of calibration parameter ID, calibration profile name,
and hardware setup. When APEX opens an experiment file with a
calibration section, it will search an internal database for a value
corresponding to this combination. The database is stored in the Windows
registry or in a text file under in Linux. By default the database is
specific for the current user. If you want to share calibration values
across users, you need to make a profile global using the tool.
Calibration values can be exported and imported to transport them across computers, or simply store them for future reference. This feature is available in the manage hardware setups screen in the calibration GUI.
See Calibration
Results
After completion of the experiment a file containing results can be
saved to disk. The default results file is in XML and it has the
extension .apr. It contains all the information about the course of
the completed experiment (e.g. number of reversals/trials, mean of
reversals/trials in case of an adaptive procedure). APEX automatically
assigns a default name to the results file. Namely, it append
-results to the name of the experiment file (e.g.
gapdetection-results.apr). APEX will never overwrite an existing results
file, but will append a number to the results file in case of an
existing results file (e.g. gapdetection-results-1.apx). The subjects
name can be appended automatically to the suggested results file by
specifying it in the <subject/> element. This is typically
modified at the beginning of an experiment using an interactive entry
(see Interactive)
.
e.g.:
    <results>
      <subject>John Doe</subject>
    </results>
Please read section [chap:Results] for more information about displaying and analysing results.
Interactive
Interactive allows the experimenter to modify certain aspects of the experiment file right before the experiment is started using a GUI.
General
General defines some general parameters.
Parameters
There are two types of parameters:
- fixed parameter:
-
a fixed parameter is a property of a stimulus. It cannot be changed by APEX 4 at runtime and is defined when the experiment file is created. It can be used by the procedure to select a stimulus from a list, it can be shown on the screen or it can be used as a piece of information when analyzing results
<stimuli>
    <fixed_parameters>
        <parameter id="gap"/>
    </fixed_parameters>
    <stimulus id="stimulus1" >
        <datablocks>
            <datablock id="gwith5msinterval" />
        </datablocks>
        <fixedParameters>
            <parameter id="gap">5</parameter>
        </fixedParameters>
    </stimulus>
</stimuli>
Fixed parameters are often used by adaptive procedures. If a certain fixed parameter is selected to be adapted by a procedure, the stimulus to be presented will be selected using that fixed parameter. The stimuli are selected amongst those listed in the current trial. In this example the duration of the gap is varied in a gap detection task.
- variable parameter:
-
a variable parameter is a property of an object of which the value can be changed at runtime. Variable parameters can be set by various APEX 4 modules. Examples of modules that can define variable parameters are AdaptiveProcedure, Calibrator and Screen. Variable parameters can also be defined for a Stimulus. If a stimulus description contains a variable parameter, it will be set just before the stimulus is presented. Examples of modules that can have variable parameters (to be set by another module) are Filter, Controller and Device.
     <stimuli>
         <fixed_parameters/>
         <stimulus id="stimulus0">
             <description>Stimulus0</description>
             <datablocks>
                 <datablock id="datablock0"/>
             </datablocks>
             <variableParameters>
                 <parameter id="speaker">3</parameter>
             </variableParameters>
             <fixedParameters/>
         </stimulus>
     </stimuli>
A variable stimulus parameter, is a parameter that will be set elsewhere just before the stimulus is sent to the device. Take care that a variable parameter is not set by different modules and/or a stimulus, as the resulting behaviour is undefined.
e.g. In examples 1 and 2 in Examples gain of an amplifier is made a variable parameter by assigning it ID
Apexconfig
The file is a configuration file that applies to all experiments. It is stored in the folder, under the main APEX 4 folder. It includes common names of sound cards and drivers and prefixes that can be referred to from any experiment file.
If the is not defined for the current system user the one in the APEX 4 folder will be used. It is, however, also possible to have an file per user. To add an file for a specific user, log in as the user, and copy the apexconfig.xml file to the folder . If the file is present in the latter folder, it will override the file in the config folder under the main APEX 4 directory. APEX 4 can automatically make this copy when you click the “edit apexconfig file” option in the help menu.
Using prefixes
When specifying a prefix in an experiment file (e.g. in or ), it is possible, but not necessary to write out the (entire) path in the XML file.
This path can also be defined once in the file located in the directory .
<uri_prefix source="apexconfig">speechmaterials</uri_prefix>
This is done by specifying the prefix ID in the APEX 4 config file and setting the attribute to in the experiment file. You can specify a complete or part of it.
The prefix “speechmaterials” that you are using in the experiment file is defined in . Sometimes it is useful to make your own apexconfig file see Apexconfig. This way, you can create several prefixes that for example refer to a folder containing all your stimuli (several speech materials, noise, modulated stimuli etc.) You can link your prefix with the absolute or relative path of the folder as follows:
<prefix id="regression">file:../stimuli</prefix>
If a prefix is specified inline (i.e.: as the content of the element), it is advisable to avoid using absolute paths. This makes your experiments portable to other computers. A relative path given in the element is always relative to the path of the experiment file. Since APEX 4 knows the location of the experiment file, only the folder containing the wave files (and pictures) must be specified.
In the following example, where the experiment file resides in , the relative path will point to .
<uri_prefix>../stimuli</uri_prefix>