apex-documentation
SPIN interface
APEX/SPIN is a plug-in for APEX, which lets the user specify the speech material and a number of other parameters in a graphical user interface, without requiring any in-depth technical knowledge. APEX/SPIN consists of a GUI that can automatically generate an experiment file for a list of tokens from a speech material and the procedural details specified in the interface. This experiment file is then loaded by APEX and the further course of the experiment and results analysis is identical to normal APEX operation.
Installation
APEX/SPIN is bundled with the main APEX platform. When using APEX/SPIN with speech material provided by ExpORL, the speech material can also be installed from an installer package, without requiring any further configuration.
When using custom speech materials, it is necessary to set the path
where the speech materials can be found on disk. This can be done by
editing the apexconfig.xml file see Apexconfig. At
the bottom of the apexconfig.xml file, prefixes are defined. In an
experiment file, one can refer to a prefix, which is then fetched from
the apexconfig.xml file. APEX/SPIN uses the “speechmaterials” prefix, to
refer to wav files belonging to a speech material. For example, if the
speech materials are installed in c:/speechmaterials, the following
lines would appear in apexconfig.xml:
{caption="Specifying" a="" prefix=""}
<prefixes>
    <prefix id="speechmaterials">file:c:/speechmaterials</prefix>
</prefixes>
During the experiment, by default APEX uses the system default sound
card. If multiple sound cards are present, make sure the desired one is
set as default in the Windows control panel. Alternatively, the sound
card to be used can be specified in spin.xml (see Customizing). If the integrated sound card is used,
system alerting sounds and sounds produced by other software such as an
e-mail client should be disabled, as they would disturb the test and
could be very loud.
Step by step
To enter the APEX/SPIN GUI, APEX should be started, and the SPIN button should be clicked.
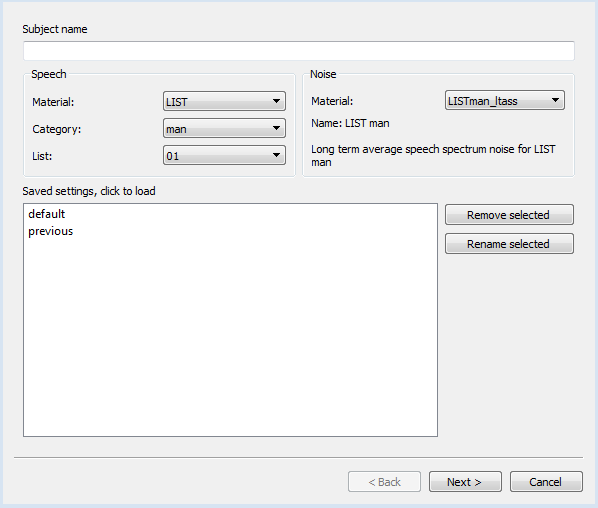
On the first page of the GUI, the speech material to be used is selected. All speech materials consist of lists of tokens, but some materials have additional subdivisions, such as different speakers. Such subdivisions are called categories, which can also be selected in the GUI. In figure spin main, list 1 from the LIST speech material is selected, using the male speaker (category “man”). The masker (noise) is in this example the long-term-average-speech-spectrum noise supplied with the LIST speech material. Any combination of speech material and noise can be freely selected. Custom speech materials or noises can be added (see Adding speech materials and noises). Below the speech material selection elements, one has the possibility to save a set of SPIN settings for later use. For instance, if one often uses the LIST material in noise under headphones with an adaptive procedure, these settings can be saved and loaded later on with a single click.
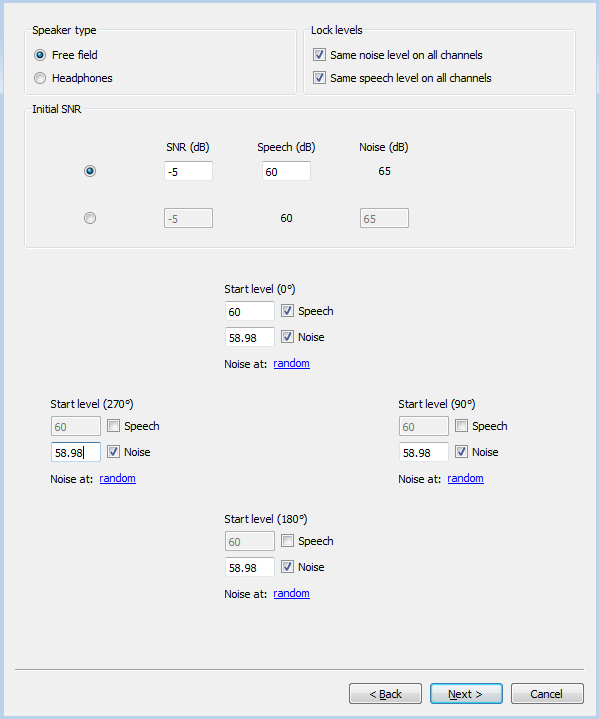
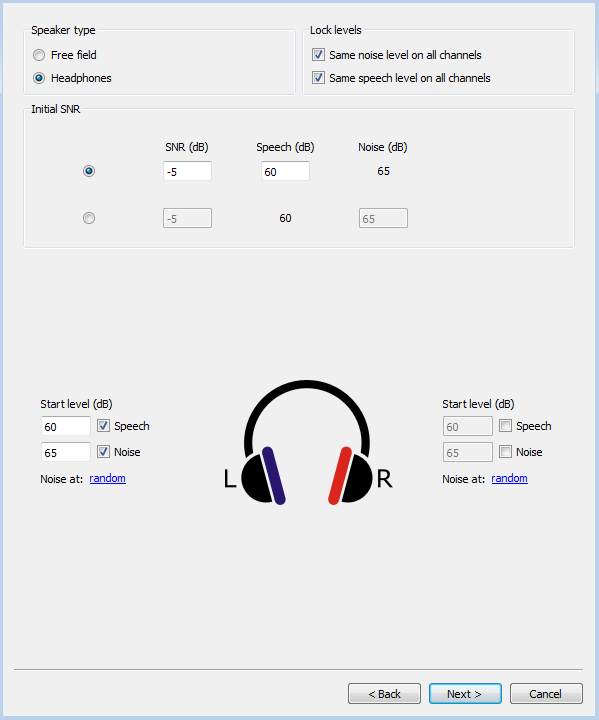
On the second page (Speakers), the loudspeakers or headphones to be used can be specified (see figure speakers. First, free field or headphone stimulation has to be selected. For headphone or single-loudspeaker free field stimulation, the overall speech and noise level obviously correspond to the speech and noise level specified for one ear or for one loudspeaker (right panel of Figure 2). In free field mode, one can either specify the overall speech and noise level, and then speech and noise levels for the individual loudspeakers are automatically calculated, by adding power in linear units (assuming that the noise is uncorrelated across loudspeakers) and converting back to decibels. An example is shown in the left panel of Figure 2. Alternatively, speech and noise levels can be specified separately for each ear or loudspeaker.
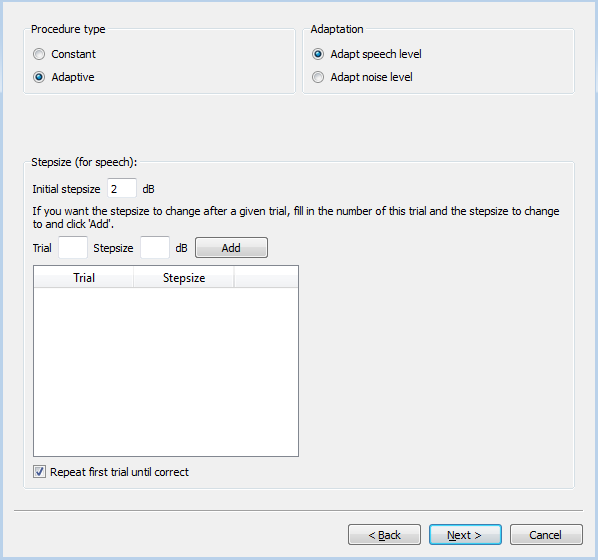
On the third page, procedural parameters can be entered (see figure). For constant procedures there are no parameters, but for adaptive procedures, the step size (in dB) can be specified, and there is an option to repeat the first token until a correct answer is given in order not to use too many tokens at SNRs far from the SRT. On the top right, the user can indicate whether the speech level should be adapted, in which case the noise level will be fixed throughout the experiment, or whether the noise level should be adapted, in which case the speech level will be fixed. A fixed noise level is often used when testing noise suppression algorithms. A fixed speech level is often used when the speech needs to fit within a hearing-impaired subject’s limited dynamic range. The starting value of the parameter that is adapted (speech or noise level) is determined by the values entered in the Speakers tab.
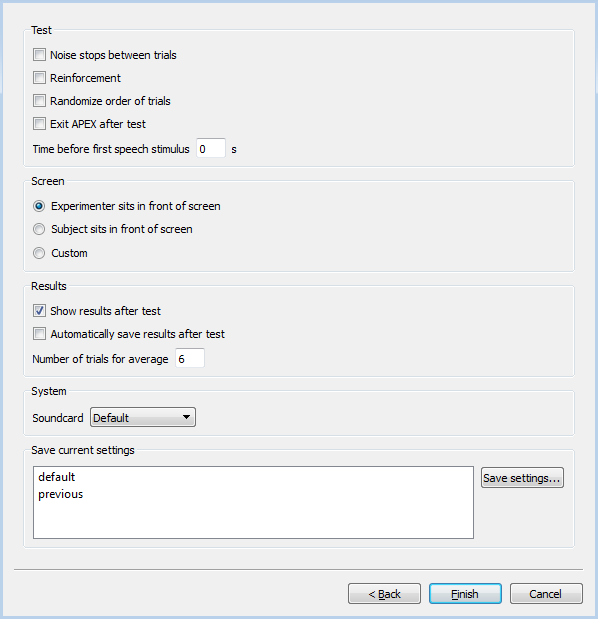
Finally, on the fourth page, various options can be specified (see figure). Most options are self-explanatory.
- Noise stops between trials
-
If checked, the background noise will be started 1 s before the speech token starts, and be stopped 1 s after the end of the speech token. Otherwise, the noise continues throughout the experiment.
- Reinforcement
-
If checked, the subject will receive visual feedback after each trial: if the response was correct, a green thumbs-up symbol will be shown, and if the response was incorrect a red thumbs-down symbol.
- Screen
-
If there is a test leader present who controls the computer, the correct response and current SNR will be shown on the screen, together with buttons to indicate whether the response was correct or false. If the subject controls the computer, the correct response will not be shown, but a text box will be shown in which the subject can type the response. Alternatively, a custom screen can be defined (see section [customising]).
- Show results after test
-
If checked, a graphical display of the results will be shown after the test, and in case of an adaptive procedure, the SRT will be calculated as the average of the “Number of trials for average” last SNRs presented.
When all tabs have been completed, the user can press the “create experiment” button. An experiment file will then be generated, and APEX will query where it should be saved on disk. If the experiment file is stored together with the results file, all experimental parameters can be retrieved later on.
Calibration
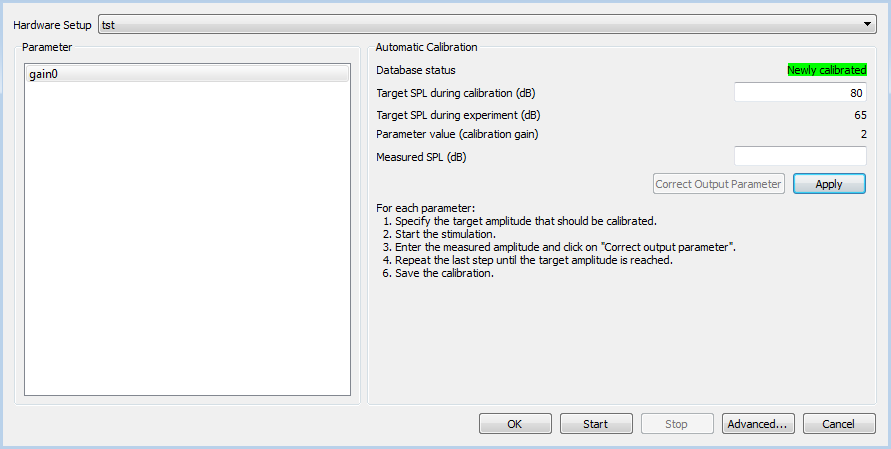
See Calibration for a general description of the calibration infrastructure. With APEX/SPIN, a different calibration profile is generated for each combination of speech material and noise. The noise is used as the calibration stimulus. In most cases this will be the long term average speech spectrum noise accompanying the speech material.
From the calibration dialog, proceed as follows to calibrate:
-
Set up the sound level meter to measure the output of the headphones (using an artificial ear and pressure gradient microphone), or loudspeakers (using a free field microphone) and make sure the sound level meter is properly calibrated.
-
Select the parameter to be calibrated from the list. Parameters are numbered according to output channel. For headphones, 0 is the left ear and 1 is the right ear. Loudspeakers are numbered from 0 to the number of loudspeakers minus one.
-
Press “start”, the noise will now be looped.
-
Read the sound pressure level (in dB A or dB SPL) from the sound level meter, and enter it in the “measured amplitude” box. Note that APEX does not store the measurement unit. It is the user’s responsibility to use consistent units.
-
Press “apply”. The sound level will now be adjusted in order to achieve the target level (“calibration amplitude”).
-
Check if the measured sound pressure level now corresponds to the target level. If it does, press “apply”. Otherwise, repeat the latter two steps above.
-
Repeat for each parameter in the list.
The “output parameter” value will be used by APEX to set the sound to the desired level. For example, if the calibration amplitude was 80 dB A, with corresponding output parameter of 2 dB, and the user requests a speech level of 60 dB A, APEX will set the parameter to $60-80+2=-18$ dB during the experiment.
Note that a noise needs to be defined for each loudspeaker to be calibrated. If you want to calibrate a speech in quiet experiment, first create the same experiment with noise on each loudspeaker (check the relevant check box in the “Speakers” tab), start the experiment, calibrate, exit, and then start the speech in quiet experiment.
Also note that if you recalibrate for an existing hardware setup, you need to recalibrate for each combination of speech material and noise that will be used.
Adding speech materials and noises
Our lab provides a number of speech materials in a format readily usable with APEX/SPIN, including LIST and LINT, LIST-m, FIST and FrMatrix, NVA, VU and HINT.
Alternatively, users can easily add their own speech materials and
noises. This involves creating an XML file with the required
information. For each speech material, a separate XML file can be put in
folder config in the APEX path, named
speechmaterial_MySpeechMaterial.xml. An example speech material file
is shown below:
<apex:speechmaterialfile>
    <noises>
        <noise id="NoiseId">
            <description>Human readable description of noise</description>
            <name>Noise name</name>
            <uri>mymaterial/ltass.wav</uri>
            <rms>-21.6</rms>
            <speechmaterial>MyMaterial</speechmaterial>
        </noise>
    </noises>

    <speechmaterial id="MyMaterial">
        <rms>-25</rms>
        <list id="1">
            <speechtoken id="1">
                <uri>mymaterial/sentence1.wav</uri>
                <text>First Sentence</text>
            </speechtoken>
            ...
        </list>
        ...
    </speechmaterial>
</apex:speechmaterialfile>
First a noise is defined that will be linked to the speech material.
This is typically long-term-average-speech-spectrum-weighted noise
corresponding to the speech material. Below, the speech material is
defined. Note that the file names next to <uri> are relative to the
speechmaterials prefix (see Installation). The <text>
of each token can be shown on screen during the experiment to allow
scoring. Both the noise and speech material have a tag <rms>, which
defines the root-mean-square (RMS) level in dB FS, and will be used to
match noise and speech levels. For example, for the RMS levels in the
example, and a desired SNR of 0 dB the noise would be attenuated
relative to the speech by $-25+21.6=3.4$ dB.
To add a noise that is not linked to a speech material, for example,
ICRA noise, babble noise or competing talker, it can be added to any
speech material file or to the spin.xml file as illustrated above. In
this case, the element <speechmaterial> needs to be omitted.
Customising
APEX/SPIN has some settings that cannot be set in the GUI, but can be
configured by advanced users. This is done by editing the
config/spin.xml file in the APEX path. Some examples are given below.
<apex:spin>
    ...
    <speaker_setup>
        <speaker>
            <angle>0</angle>
            <channel>0</channel>
        </speaker>
        <speaker>
            <angle>90</angle>
            <channel>1</channel>
        </speaker>
    </speaker_setup>
    ...
    <subject_screen>
        <screen id="subject_screen">
            <gridLayout height="2" width="1" id="main_layout">
                <label x="1" y="1" id="helplabel">
                    <text>Type what you hear</text>
                </label>
                <textEdit x="1" y="2" id="text"/>
            </gridLayout>
            <default_answer_element>text</default_answer_element>
        </screen>
    </subject_screen>
    ...
</apex:spin>
Under <speaker_setup>, speaker angles (relative to the subject, 0
degrees means in front of the subject, 90 degrees to the right of the
subject) are associated with sound card channels, numbered from 0. This
should reflect the physical connections from the sound card to the
loudspeakers. Under <subject_screen>, the screen layout during testing
is defined, for the case where the subject sits in front of the screen.
Here one could, for instance, translate the text or customise the look
and feel. The remaining options of the spin.xml file are documented in
its associated schema file, spin.xsd.
To customise the way results are analysed and shown, one can edit the
HTML5 file that is used by APEX for this purpose. This file is called
config/rtresults.html under the APEX path.
If further customisations are required that are not available in the GUI
or spin.xml file, there are two remaining options: editing the
experiment file generated by APEX/SPIN, or changing the source code of
APEX/SPIN itself, which is freely available.
Processing results
The option “Show results after test” can be selected in the APEX/SPIN
dialog. When a results file is opened in APEX at a later stage, the same
analysis is shown. The full results file should be stored such that
additional information that may be required at a later time for further
analysis, such as reaction times, is still available. From this
analysis, one can simply note the required value (e.g., the SRT or
percentage correct), print the results, export to PDF, or copy the raw
data to another program. Alternatively to copying the results manually,
one can automatically collect the results. For example, data can be
exported to the comma separated values (CSV) format or can be processed
directly with the APEX Matlab Toolbox (e.g., a3speechresults.m) or
APEX R Toolbox that come bundled with APEX.